New Pattern & Request

Introducing, Itty Bitty Butterflies Baby Hat: a soft beanie-style hat featuring a row of delicate little butterflies and a cable ribbed brim.

DSC_0549

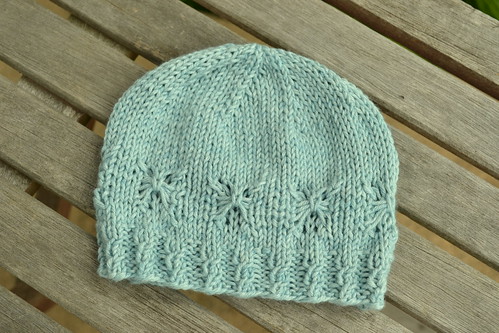
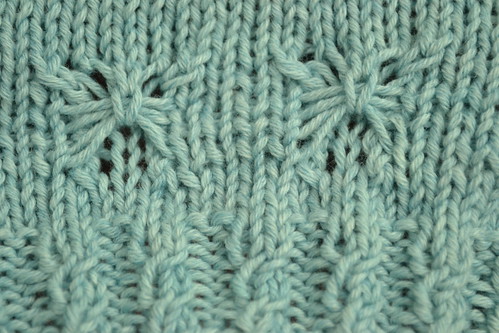
The pattern includes a both written and charted patterns and a step-by-step photo tutorial to guide you through creating those unique butterflies which, unlike a standard butterfly stitch pattern, have a lacy underlay to make them stand out and appear a true butterfly shape.

DSC_0552
This sport weight knit is worked up in Berroco Corisca, a 90% cotton, 10% cashmere blend to cradle the tenderest new skin in luxury.

Itty Bitty Butterflies is available in sizes premie, newborn, 3 months, 6 months, and 9 months.

I designed this upon my husband’s request for a baby gift for a coworker when he foolishly asked, “Do you know how to knit a baby hat?” Perhaps he missed the fact that I knitted all of our baby boy’s hats and practically everything the child wore for the first weeks of life or that I’ve been knitting and designing non-stop for years. Or perhaps it was just his clever way of getting me to consent to knit a baby gift for someone I don’t even know by insulting my ability so I would prove him wrong.

In any case, I designed this hat without personally knowing a little baby who could model it for me – my big guy at 18 months is the size of a 2 year old. And that’s where you come in. If any one out there personally knows a tiny baby who could model this hat, please email me vinthill (at) hotmail (dot) com [written as such to avoid spam but you know how to type it correctly into email format] and I will send you a free copy of this pattern for you to make as well as a free copy of another pattern of your choice from my Ravelry shop in exchange for the use of a photo of your little one modeling your finished product. The photo does not have to be professional but something better than a simple snapshot. It needs to have decent lighting and background (plain is fine, just not clutter). I will need a photo use release signed by the parent or legal guardian of the child as well as the person who took the photo which will allow me to use the image in marketing the pattern via blog and Ravelry.

If you agree, I’ll first send you a contract of the terms, then upon receipt I’ll send the hat pattern. Once you send me the photo and releases, I’ll send your final payment of another pattern of choice from Vint Hill Knits.

Hopefully you or someone you know has a little baby girl (or a boy, who am I to judge?) who would look darling in this hat. Please share and send this link to anyone you know who knits.
DSC_0548
The Itty Bitty Butterflies Baby Hat pattern is now available through my Ravelry store, Vint Hill Knits so even if you want to knit it up to give it away and can’t help with the model request, you can still pick up your copy today.


Beachy Butterick 5901

DSC_0624

When my dear Hancock Fabrics closed, I picked up this piece of heavy but slinky floral knit. I haven’t a clue of the fiber content but I’m sure it’s all synthetic. It was a factory remnant and had a few large areas where the printing ink was smeared terribly but I knew that with careful cutting there would be enough of it for a little wrap skirt to wear as a beach cover-up or just hanging out in our favorite little island town, Chincoteague on the Eastern Shore of Virginia, home of the famous wild ponies (The ponies actually live on Assateague Island just across the little channel but everyone knows them as the Chincoteague ponies.) I have a few wrap skirts in my vintage pattern stash, each not much different than the last but I decided to try out one I’ve never worked with before. Butterick See & Sew 5901 is undated but based on the envelope design and photo styling, it’s solidly a 1970’s pattern.

B5901
It’s multi-sized M, L and XL. I didn’t realize it when I hastily saved it for myself from a lot of patterns destined for my shop but the original owner slashed and spread it to enlarge it about 4 inches above the XL size. Since I was going for the medium, that meant it was just easier to use the pieces as a rough guide to trace my own. If I’d realized that I was going to put that much effort into this pattern, I never would have kept it and would have just stuck with one of my other wraps skirts – perhaps even the pattern first piece of clothing I ever made.

In any case, I traced it off and made major adjustments including chopping about 15 inches off the bottom and cutting what should have been on the fold as two pieces to fit on my damaged fabric.

Aside from seaming the center back, the only construction change I made was omitting a buttonhole in the waistband for the tie to thread through. I didn’t want to fool with a buttonhole on a spandexy knit fabric and I don’t think it made much styling difference in the end. I did, however, construct the whole thing on my serger and finish the edges with my coverstitch. Oh, I also left off the interfacing on the waistband and ties. Ok, ok. so I made about as many construction changes to a wrap skirt as one possibly could. Haha!
DSC_0622

It was a lovely quick project for the most part and tremendously satisfying. I know I’ll get lots of wear out of it on our frequent weekend getaways to Chincoteague.  In fact, I donned it at least 5 times this past weekend alone. DSC_0620
Thanks to my 6 year old for his photography skills since the kids and I made this beach trek without Daddy and I didn’t pack a tripod. Also, enjoy my North Pole tan. LOL!


Burda 6764

Here’s the quick little top I promised you two weeks ago. I’m still catching my breath and catching up on “me time” after sending a herd of kids back to school.
DSC_0573

This is burda style 6764. I made view A and will never, ever make view B, as it makes even the size negative 2 model look broad shouldered. I imagine I’d look like a linebacker in it with my actual wide shoulders.

6764

Anyway, this was a pretty straightforward pattern to work. I adjusted the flat pattern before cutting, shortening it between the shoulder and bust apex, as usual. In this case, I took it all out just under the armpit so as not to interfere with the gathered yoke.

I did all the sewing on my serger and coverstitch machine. Following the pattern, I stabilized the neckline. I used strips of fusible interfacing though it said to use Vilene bias tape. Correct me if I’m wrong, but I don’t think Vilene tape is readily available in the U.S.. – at least not anywhere I shop.

Much of my time was spent switching back and forth between machines, as I only have the table surface for either the serger or coverstitch and must trade them as needed. Often this requires swapping out thread, too, since I only keep 4 cones of each major color I work with, but this time I used 3 regular spools of black in the coverstitch, as I happened to have plenty of those.

Aside from swapping machines, it came together  very quickly and easily. The yoke gathers gave me a little trouble and are less evenly spaced on one side, while very pretty on the other. I wish I had basted them in place prior to serging the seam. But at that point it was too late and wasn’t awful enough to rip out all that serger thread!
DSC_0572

I wasn’t sure how I would feel about the horizontal seam that runs across the back where the yoke joins the body but in this dark gray knit fabric it’s hardly noticeable. I considered altering the pattern and cutting the yoke and back all in one, but soon realized that the yoke must be separate to finish the armhole edge and still provide seam allowance for the back to join the front at the side seams.

DSC_0578

While the interfaced neckline holds shape and doesn’t exactly gape, I found myself a bit exposed when bending over with kids all day simply because it’s low cut. I wore a safety pin where the neckline crosses and you can find it if you look closely where the center front is pulling. I think I’ll tack the center front together before another wear. In fact, it’s sitting all freshly laundered on my sewing table waiting for a tack right now.
DSC_0575

On a completely separate note, check out the new necklace I made! DSC_0577

Isn’t it cute? I dabble in jewelry making and came across these little sewing charms a few months ago. I usually stick to making more “from scratch” pieces of jewelry rather than “slap and dash” things, but I loved these little guys too much to leave them behind. From your left to right there are a thimble, antique sewing machine, scissors, button, and spool of thread.

See you shortly with a beachy make!


And just like that it’s August

What happened to July? The last I knew I collapsed in a breathless heap after stitching my little fingers off (figuratively!) for Indie Pattern month in June to meet all of my deadlines for the contests on TMS as well as a submission to a knitting magazine [which was rejected. Boo hoo :*( ] .

Then my household was suddenly plagued with summer illnesses – multiple ear infections, pink eye, strep, sinus infections, a stomach bug, and most notably – hand, foot, and mouth disease. My baby caught HFM first – probably when he went to the doctor for pink eye and then shared it with the rest of us. He was the only one who got it really bad – so bad in fact that his skin looked like he was a burn victim but it still left me with blisters all over my fingertips and unable to sew or knit a stitch, or type anything for that matter, for weeks.

Ok. Enough of the pity party. That’s not what this is about. After more or less recovering I have managed a few projects in the past few weeks that I’d like to share but first, a big THANK YOU to all who voted for my entries for IPM on TMS. I won two of the three contests I entered and took home some beautiful prizes.

For the New to Me contest I received three patterns: the Natalie Dress and Top from Muse patterns,
purpleDetail_1024x1024

the Bronte top from Jennifer Lauren,

B37_web

and the Sylvie Dress from Christine Haynes which I think will look great in a border print floral I inherited from my Grandmama.
Sylvie-Both-Views_e0720fd3-c108-4aa7-a27a-799120e98fc4_grande


For the Hack It contest I won two patterns from Oki Style – I chose the Cinco men’s raglan shirt 

cinco3

and the Nandia coat.
mantelnandia1

And I got my coveted London Coat Dress pattern from Sew Chic! Squeal! london_1


I’ve already stitched up a Bronte top because this had been on my pattern wish list (yes, it’s an actual list about 100 items long) for a long time and I couldn’t wait to get started on it. I’d also been ogling the London Coat Dress, but that’s a longer term project so I haven’t started on that.

To start, I have to give some major credit to Jennifer Lauren for making the pdf tile together separately for each pattern piece. I really hate pdf patterns because if you get one page just a hair crooked it messes up the whole shebang. This one doesn’t end up being a giant floor puzzle gone wrong, but rather 4 separate puzzles that are much more managable. It really made it much more of a pleasure to assemble.
DSC_0571
I used some leftover $1/yard dark teal knit from the clearance bin at Walmart that I picked up to make a self drafted pattern that I worked up this winter. I wanted something cheap for that project in case I really screwed it up. Spoiler – I kinda screwed it up, but a better version will be in the works next winter. I’ll share it then. But now…
DSC_0582

I had plenty of that teal knit left to make the Bronte and probably another top (or skirt?) later. I chose the cheap again because I always have to shorten patterns between the shoulder and bust apex but because of this fold-over shoulder I wasn’t the least bit sure how much to shorten it. I took a wild stab in the dark and shortened it an arbitrary amount. Again, I didn’t want to screw up an expensive fabric so here is my dark teal Bronte. The fabric is drapey and has a slight sheen and a bit of weight to it but I haven’t a clue as to the the fiber content.

I’m glad I didn’t cut into a precious piece of material because while my shortening guess worked it turned out too tight for my liking. While I love very close fitting clothes, I feel like a sausage in this thing. It’s not awful and it is quite comfortable but I don’t really like everyone to be able to count the hooks on my bra strap because my shirt is so tight.

DSC_0589

I certainly want to go up a size for the next iteration. I also need to adjust the shoulder tacks where the front of the shoulders cross. I tacked them together while it was lying flat but once it was on me, they pull too much – probably because it’s too tight.
DSC_0592
All in all, it was a fairly quick project. Just a front, back, sleeve, and binding. The longest part of it was switching thread spools back and forth between my serger and my new-ish coverstitch machine (!) because I only have 4 spools of each color. I serged the binding on, coverstitched it on top, serged the sleeves on, serged the side seams, and coverstitched the sleeve and bottom hems. So it was back and forth a couple times. But it still only took me two quick sewing sessions.

DSC_0590

I’ll be back again soon with another knit top I whipped up yesterday.

Disclaimer: Thank you to all the sponsors who donated prizes for IPM. I received these patterns free as prizes for the contests. I was not compensated in any other way and not asked to blog about them. All opinions are my own. However, give the sponsors some love and thanks for being an integral part of this awesome online sewing community.


Granville Shirtdress

Indie Pattern Month is in full swing around the globe. For The Monthly Stitch’s IMP Hack It contest, we were challenged to transform indie patterns and actually encouraged to frankenpattern! Though I’m not much for frankenpatterning, I do love to … Continue reading